Real World Power Platform Projects - Parking Request Manager - part 1: Setup

Disclaimer:
All opinions and statements made in this blog post are my own!
I am not affiliated with any entity mentioned in this post unless explicitly stated!
Prerequisites
If you do not already have a Microsoft Account you will need to sign up for one.
If you are in a controlled environment such as a Corporation you may need to first check with your IT Department to have them setup the following. Most corporation IT departments will not allow you to create the following without their help.
There are several ways to get a free account to access the Power Platform for development purposes.
My Recommendation if you need to test your apps with accounts that have different user permissions.
The Microsoft 365 Developer Program account includes 16 sample user accounts (Test co-worker accounts). With these sample user accounts you no longer have to ask your actual co-workers to help debug your apps, then wait for them to be available. You will be able to determine first hand if there are any issues with your app before you push it to production in less time if you need to ask a co-worker.
Don’t get me wrong, co-workers in my experience are more than happy to help, but they are like us, they also have a lot of priorities on their plate and sometimes it can take several days, even weeks before they have the time to help troubleshoot. Just create your FREE Microsoft 365 Developer Program account. This account will renew every 90 days as long as you are using it for development purposes.
References to Best Practices
- Power CAT Adoption Maturity Model: Repeatable patterns for successful Power Platform adoption
- Power CAT - YouTube Channel
Theming
There are several options for theming an app.
The CoE starter Kit requires Premium licensing and Platform administration permissions.
Other Options:
- Create a blank non navigable screen - add and style some controls, then reference these controls in other parts of your app. NOTE: Adds additional weight to your app.
- Create styles in an Excel Spreadsheet, then reference the styles in your Power App.
- Create your own component library just for styling.
For all the projects in this book we will create a custom theme based on the JSON structure concept from the powerapps-designtoolkit.
Things To Keep In Mind
I am not a lawyer, Please Consult Your Company Legal Department About the Following.
Before we begin developing any project that involves sensitive data, we should ask ourselves several key questions.
- What information is being stored?
- Does the data involve Personally Identifiable Information (PII)? - Keep in mind that PII is any data that can help identify an individual. This is not limited to the persons name, employeeID, SSN. Those are the obvious answers.
- Data that can help identify someone can be something like the data points of their face, their hand geometry like in Facial and Hand Scanners. Even though these devices only store the geometry data and this is not the same as a photo, that geometry data is usually tied to a record in an Access Control system such as CCURE or Lenel. The geometry data is considered PII because it points to a record that identifies an individual.
- What is the Data Encryption At Rest?
- What is the Data Encryption In Transit?
- What Regions will the app be made available to?
- What are the Regions Privacy Laws? We have to take into consideration the regional Privacy laws. States in the US who have passed Privacy Laws now include California, Virginia, Colorado, Connecticut, and Utah and many other states such as Iowa, Florida, Massachusetts, Ohio, Washington and Wisconsin and even more states are considering adopting their own Privacy Laws. In Europe there is GDPR, China requires information be kept in China. Germany has Bundesdatenschutzgesetz (BDSG), and yes, I had to Google Germany. Consult with your legal department, I am not a lawyer and can offer no advice on such matters.
Side Note:
If you or your team are required to present your project before a review committee these questions will more than likely be asked by your Legal and Network Security Departments before you are approved to proceed.
Depending on project scope, if your project involves 3rd Party Cloud Services there will be additional vendor requirements such as certifications and security documentation:
- SOC 2 Type 2
- Bridge Letters
- ISO27001
- NIST 800
- Pentests
- and more.
Various questions about data encryption, data retention, data transfer, data protection policies, data breach policies, Disaster recovery, who has access, what controls are in place and more.
Let's give our solution a name and a description!
Title: Parking Request Manager
Description:
Corporate Security departments should be notified when an employee wishes to park their vehicle on company property for an extended period of time.
Any vehicle parked on company property for an extended period of time can be subject to tow. In some cases vehicle license checks, involvement of law enforcement may be deemed necessary. Any financial and legal matters may become the responsibility of the vehicle owner.
The Security department can take reasonable action to protect vehicles parked on company property through Security Officer Patrols, Surveillance Cameras, Electronic and Manned Gates and more if the Security department is made aware of the business travelers’ intentions within a reasonable amount of time, usually within 24hrs of the business trip.

Scope:
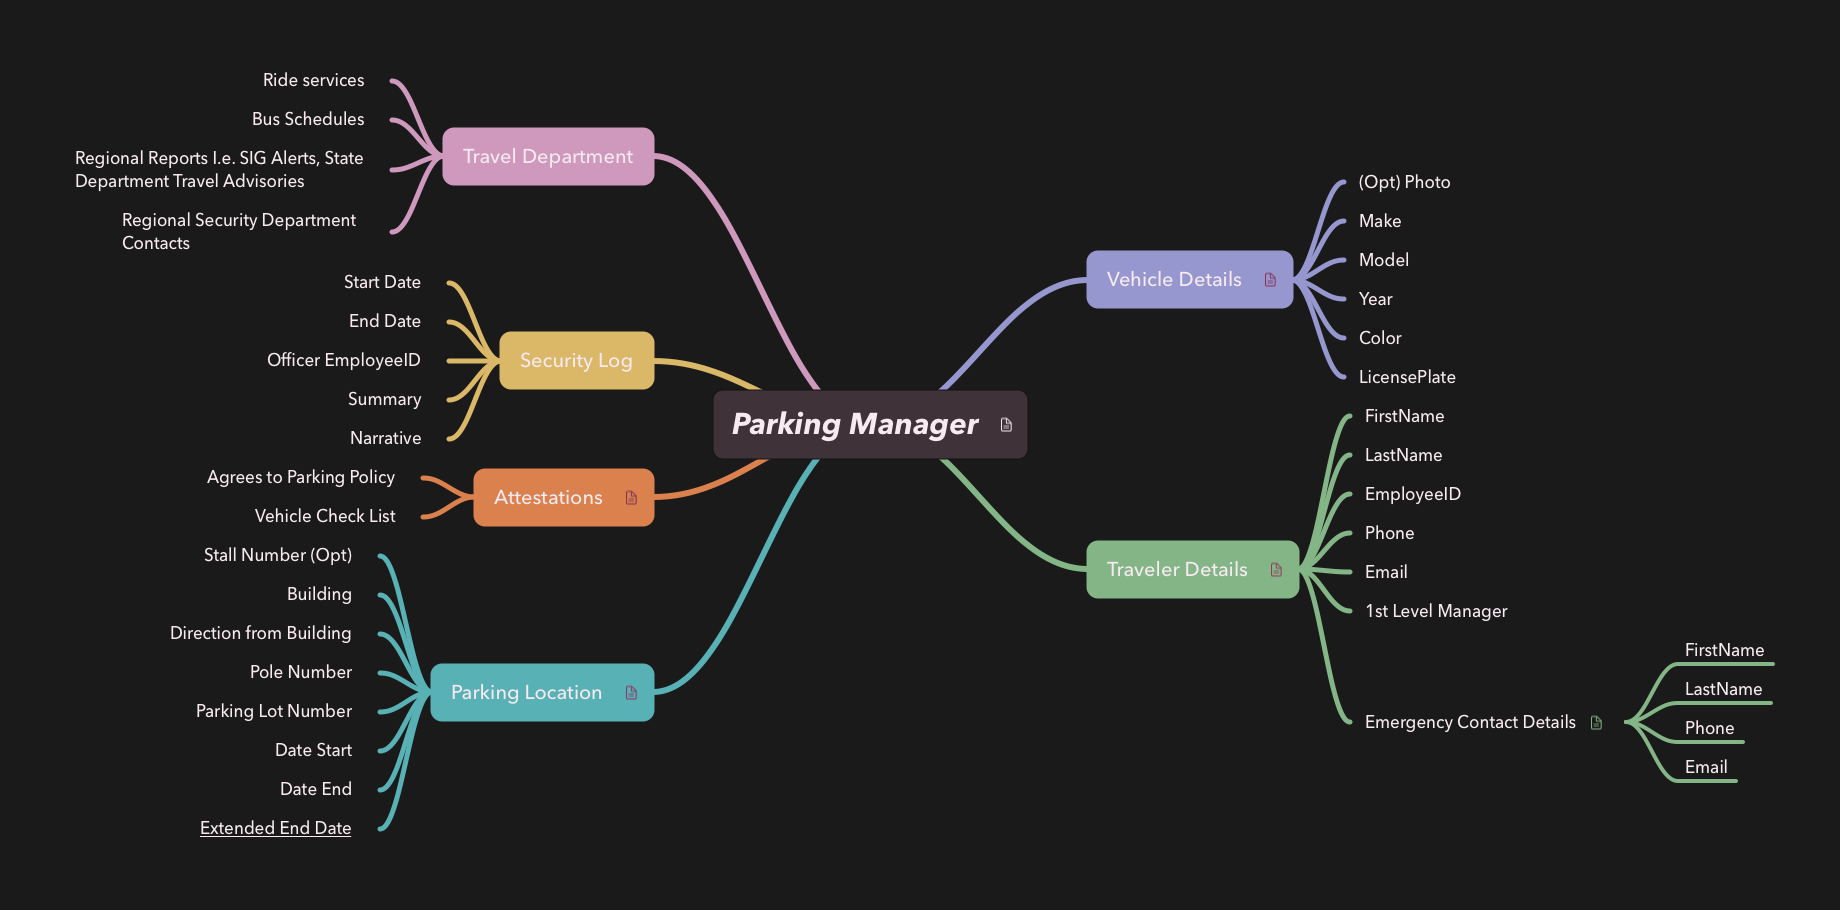
Parking Management System provides a way for the business traveler to notify their local Security Department that they wish to park their vehicle on company property while they are away on a business trip. The app should be available via Mobile, Tablet or Web. The traveler should be able to update their travel return date, e.g., Their business trip is extended!
App Assets

App Requirements
- License - All users of the app will need a Premium Power Platform License.
- Form Factors - Canvas App
- Database - Microsoft Dataverse For Teams
- SharePoint Document Library - Vehicle Photos and the Parking Policy
- Approvals - First level manager and Security Representative. All must Agree on the Outcome.
- Intake Form -
- Employee Information:
- Employee Full Name
- Employee ID - both Employee Name and Employee ID can be surfaced from the current users AAD account via Office365Users connector.
- Employee Contact Information
- Emergency Contact Information
- Employee Information:
Architecture
Create Entity Diagrams
Create Process Flows

Create Mind Maps
Setup The Database
Resources:
Dataverse Documentation: https://learn.microsoft.com/en-us/power-apps/maker/data-platform/
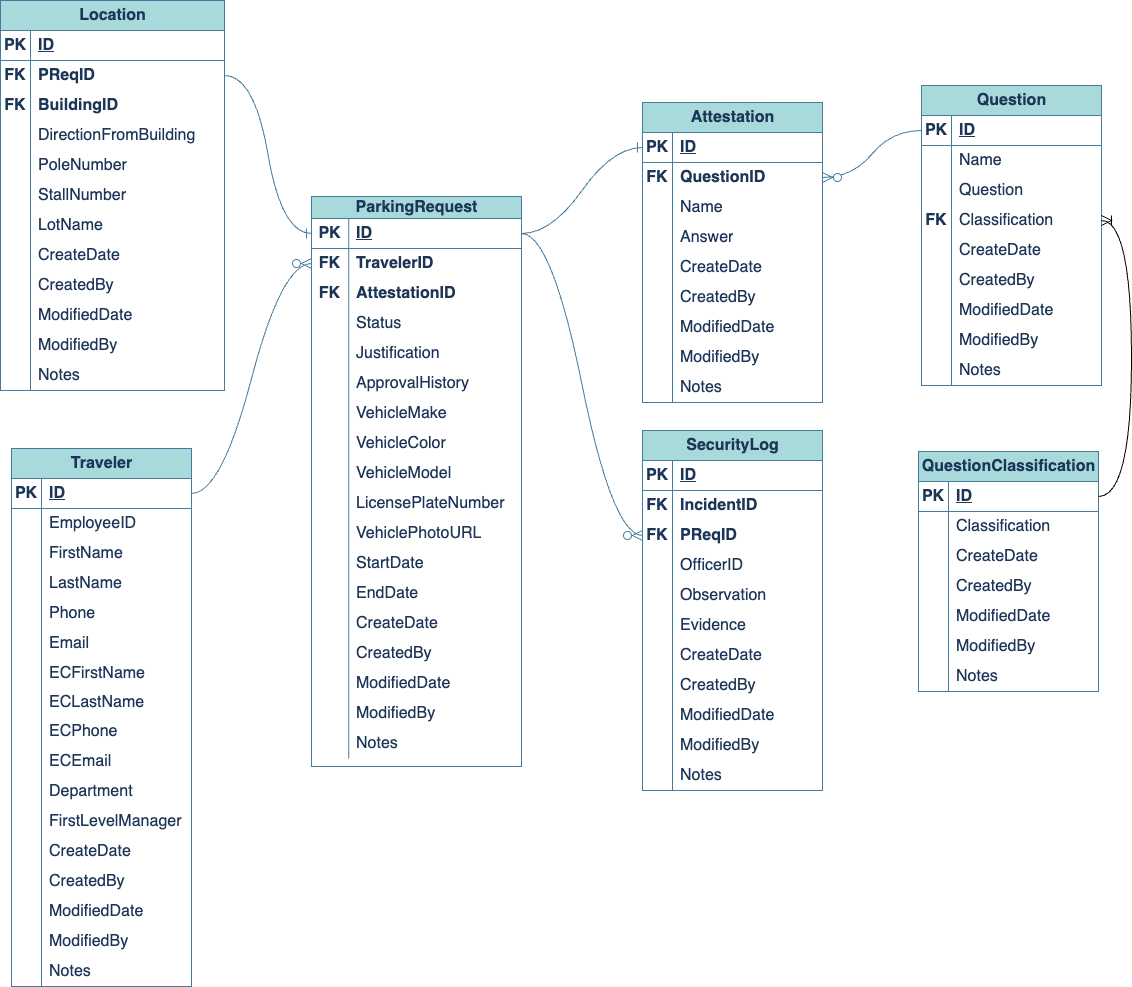
Referring to the Parking Request Entity Diagram. The diagram only shows seven tables but we will add two additional tables, Campuses and Buildings.
We can create our tables from within the app studio environment but for this project I have mocked out all the tables along with some sample data in an Excel spreadsheet.
Please see DB Schema listed above.
We will import this data into our Solution to create the necessary tables in Dataverse using Power Query.
While in the Build-Built by this team tab of the Enterprise Security team.
Click See all
- Click the Tables tab in the side panel.
- In the top command bar, click the <-| Import dropdown and select <-| Import data
- Then select Excel Workbook button
- Select the Upload file (Preview) radio button and upload the Excel file
- Login if required
- Click Next
Now you should see the Choose data screen. Select all the named tables.
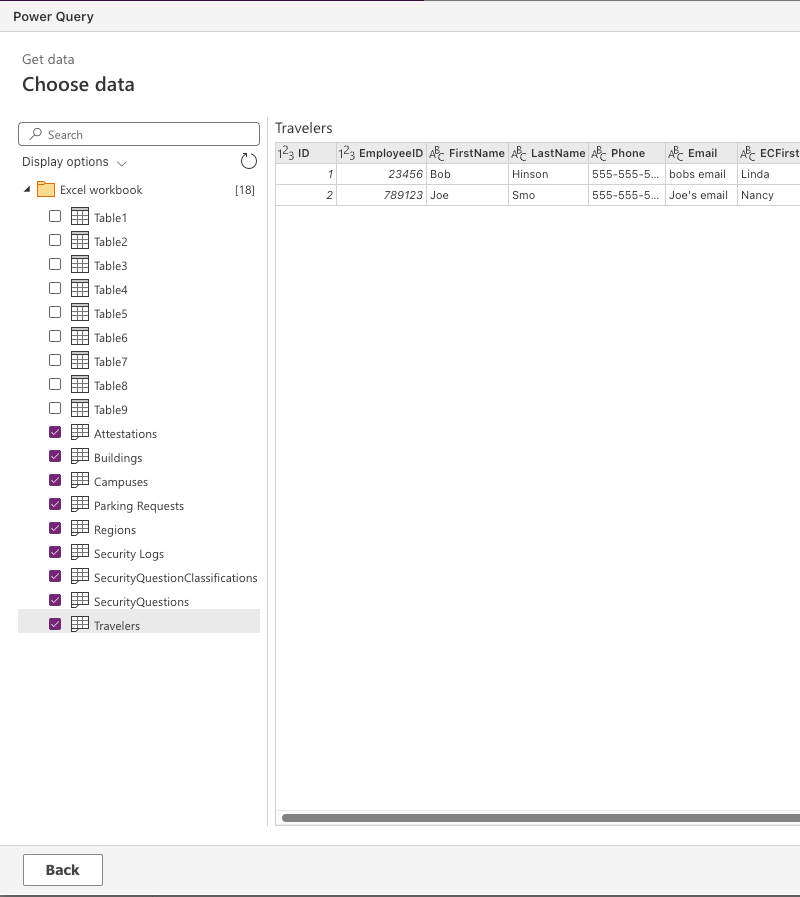
Click Next
Once satisfied, click Next.
We now see the Map tables screen. Look over each table and make sure the mappings are how you want them. Since these are all new tables, accept the default Load settings of Load to new table.
Click Next Accept the default Refresh manually
Leave the Send refresh failure notification to the dataflow owner unchecked.** Were going to check the Dataflow dashboard, no need to be notified in this case.
Click Publish Navigate the Power Apps Studio Solutions screen. Click the Dataflows tab in the side panel, it may be located under the … More tab.
Find the Dataflow that was just run.
e.g., New dataflow 1/1/2024, 7:21:36 AM
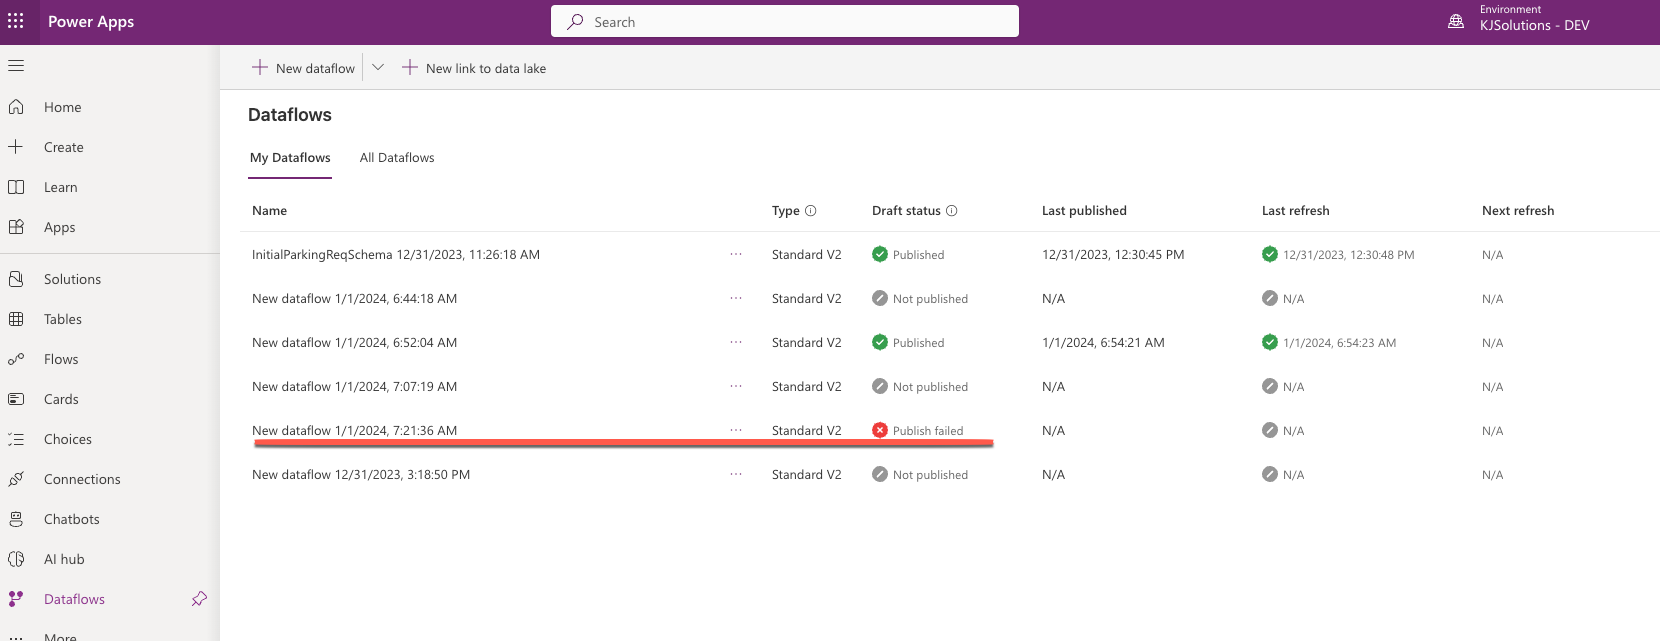
If you click the Draft status indicator it will show you the error associated with this Dataflow. In this case, I had an issue where the Excel column names contained whitespace.
Name of 'Attribute' cannot contain leading or trailing blank spaces or consist only of whitespace.
Close Power Query.
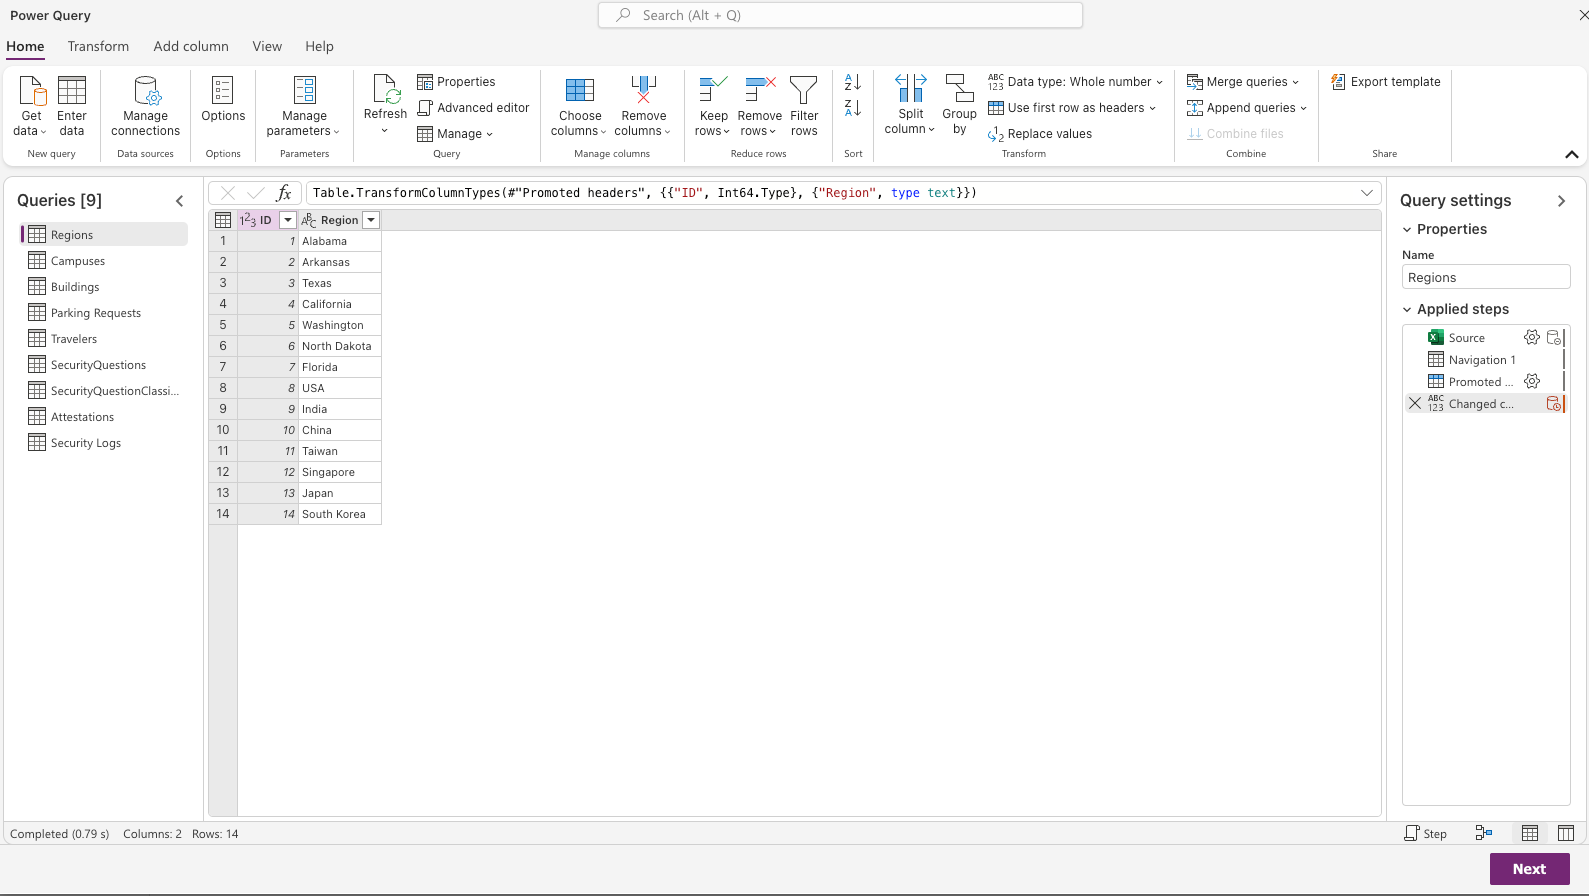
To resolve this, I removed all the whitespace from the column names, e.g., I changed First Name to FirstName. Then Power Query was happy!
When you publish, the Draft status column should eventually change to Publish in progress. It may take a little while to create all of the tables.
When the Draft status changes to Published, the Next refresh status will change to In progress. Once the refresh finishes, the tables will be created in Dataverse.
Success!
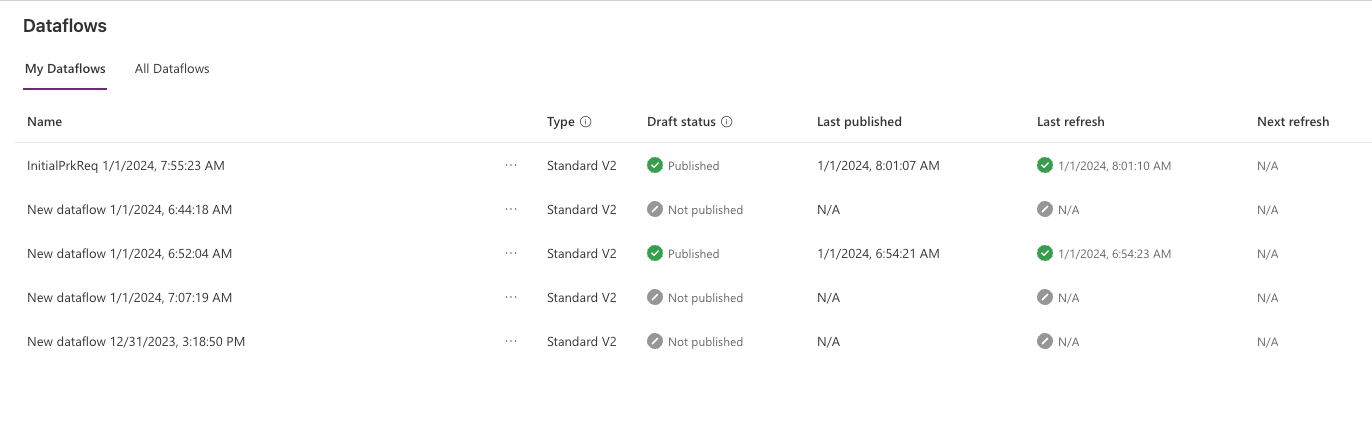
All of the required tables should now be imported into our Solution.
Even after import we need to check the tables. ID Columns are created as whole numbers, these actually need to be Lookup columns, but at present this means we need to delete those table columns and create new ones as Lookup columns.
Next make sure that any Designator column is created as a text column, and not as a number column. Designators can be a combination of letters and numbers or just text or just numbers. Depends on your company schema.
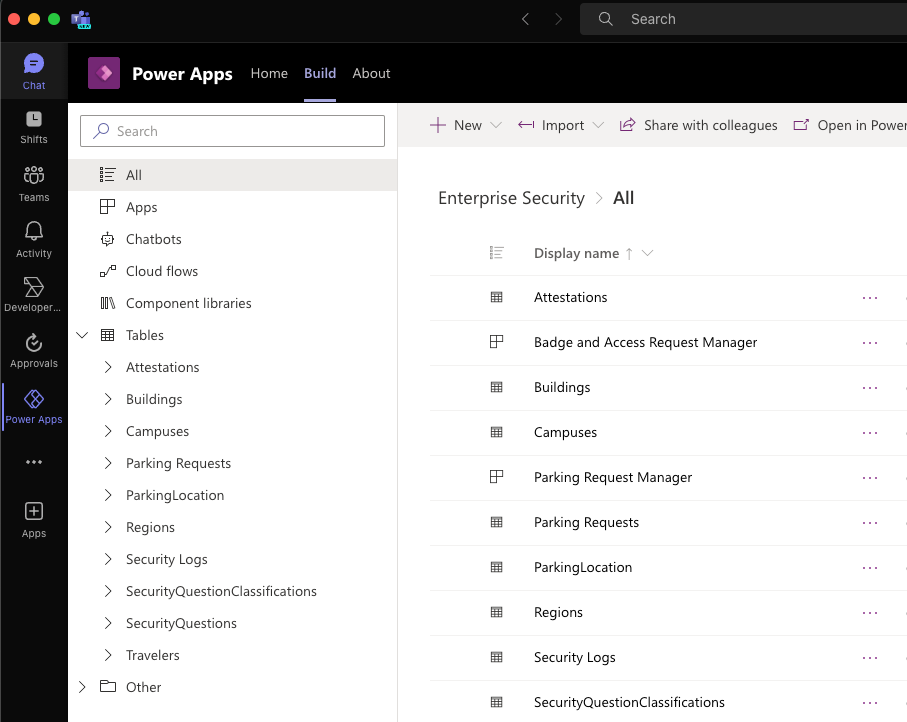
Create Relationships
In the Solution expand the Tables Tab. Refer to the Entity Diagram for the relationships and keys.
If you don’t already have the relationship setup between Campuses and Buildings, click the Campuses table.
Click Relationships.
We need to create a relationship from the parent (Campuses - Id) to the child (Building - CampusId)
Click the + New relationship Select One-to-many. One Campus to many Buildings!
In the Related(Many) dropdown, select the Buildings table. Accept the defaults and click Done.
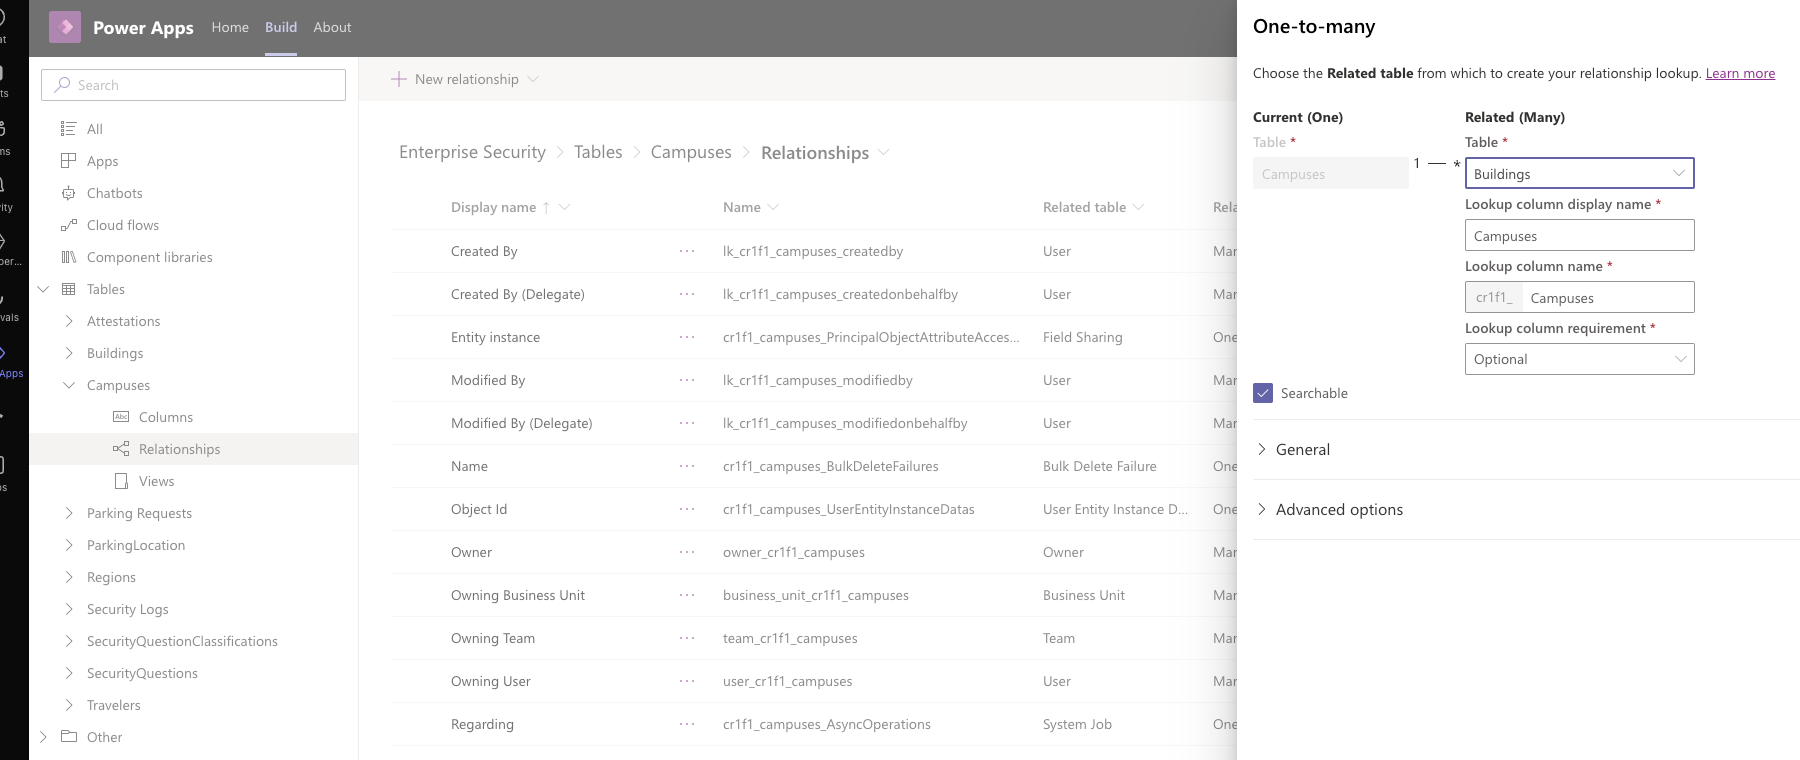
If you look at the columns of the Buildings table, you will now see a Lookup column has been added for the Campuses table.
Let’s change the Plural Display name and Plural names of Buildings and Campuses tables to Building and Campus respectively.
Why? Dataverse by default Pluralizes the table names you provide. If you look at the Properties panel of the Buildings table you will see that Dataverse has added an extra s onto the Plural name, giving us Buildingss.
In the Display Name field, remove the s, now we have Building. Dataverse changes the Plural Name accordingly.
Repeat this process for all the table names and relationships.
- Question - One-to-many - QuestionClassification
- Attestation - One-to-many - Question
- Attestation - One-to-many - ParkingRequest
- SecurityLog - One-to-many - ParkingRequest
- Traveler - One-to-many - ParkingRequest
- Location - One-to-many - ParkingRequest
Connect the Parking Request App to Dataverse
In the project Solution, open the Parking Request Manager App in edit mode.
Add all of the tables except for the Security Log table. Security Log is only for Security Personnel, it is not necessary for the Business Traveler UI.
Optional Features
Collaboration!
Collaborate with your corporate travel department to include features such as transportation services, shuttle bus schedules, public transportation schedules, approved hotels, Regional SIG Alerts, State Department Travel Advisories, Regional Security Department contacts, policies and procedures.
Collaborate with your corporate facilities department to create interactive campus maps. Allow users to click a building then auto complete the location fields on the intake form for the user.
Provide Training
- Webinars
- YouTube Videos
- Presentations
- Create a Document Library in SharePoint for videos
 slides, Word Docs and more.
Summary
In this article I covered creating the backing database in Microsoft Dataverse for Teams using Power Query to build out our schema from an Excel Template.
In the next article we will create the UI, the backing Power Automate Flows & connect our tables in Microsoft Dataverse for Teams.
Real World Power Platform Projects - Parking Request Manager - part 2: Design The App
Please be sure to check out the following companion video to this post.
Create a Parking Request App Using Dataverse for Teams & Power Apps! - Ep. 1 - Setup

Credits!
Images: Microsoft Image Creator