Real World Power Platform Projects - Parking Request Manager - part 2: Create The Form

Disclaimer:
All opinions and statements made in this blog post are my own!
I am not affiliated with any entity mentioned in this post unless explicitly stated!
Prerequisites
Setup the Dataverse database as described in Real World Power Platform Projects - Parking Request Manager - part 1: Setup
Let's review the project outline!
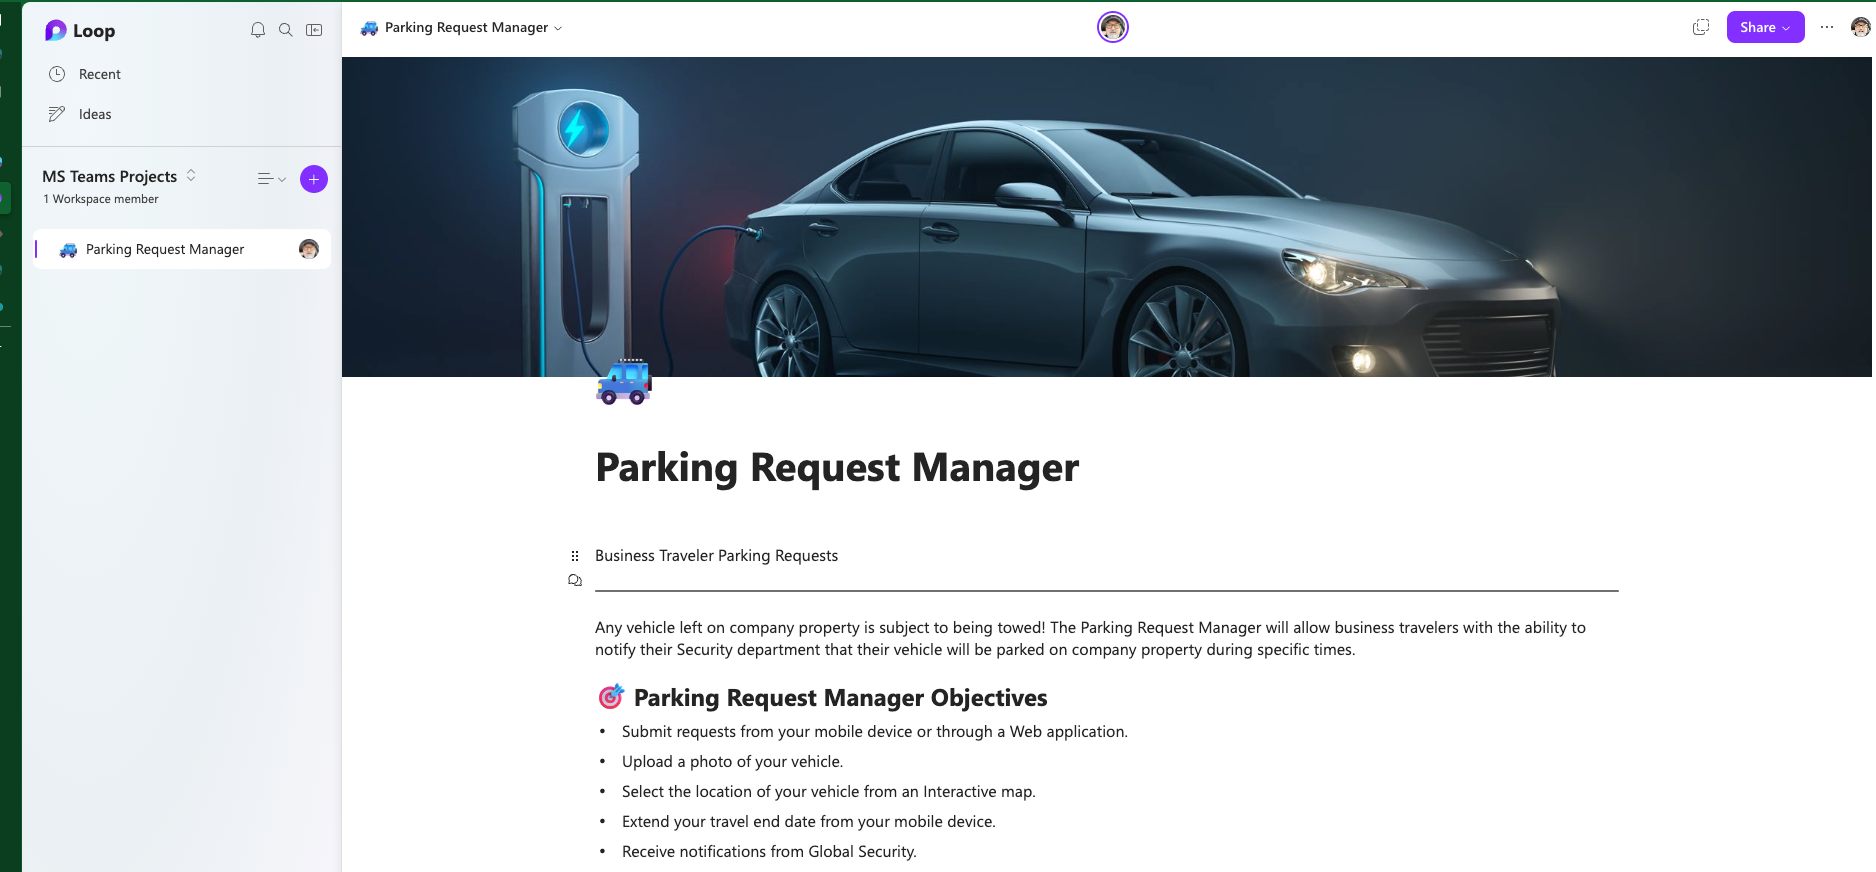
Title: Parking Request Manager
Description:
Corporate Security departments should be notified when an employee wishes to park their vehicle on company property for an extended period of time.
Any vehicle parked on company property for an extended period of time can be subject to tow. In some cases vehicle license checks, involvement of law enforcement may be deemed necessary. Any financial and legal matters may become the responsibility of the vehicle owner.
The Security department can take reasonable action to protect vehicles parked on company property through Security Officer Patrols, Surveillance Cameras, Electronic and Manned Gates and more if the Security department is made aware of the business travelers’ intentions within a reasonable amount of time, usually within 24hrs of the business trip.
Scope:
Parking Management System provides a way for the business traveler to notify their local Security Department that they wish to park their vehicle on company property while they are away on a business trip. The app should be available via Mobile, Tablet or Web. The traveler should be able to update their travel return date, e.g., Their business trip is extended!
Noteworthy
Microsoft Dataverse does not require a premium subscription until you go over 1 million rows or 2 GB of data, whichever comes first!
App Assets

App Requirements
- License - All users of the app will need a Premium Power Platform License.
- Form Factors - Canvas App
- Database - Microsoft Dataverse For Teams
- SharePoint Document Library - Vehicle Photos and the Parking Policy
- Approvals - First level manager and Security Representative. All must Agree on the Outcome.
- Intake Form -
- Employee Information:
- Employee Full Name
- Employee ID - both Employee Name and Employee ID can be surfaced from the current users AAD account via Office365Users connector.
- Employee Contact Information
- Emergency Contact Information
- Employee Information:
Create The App!
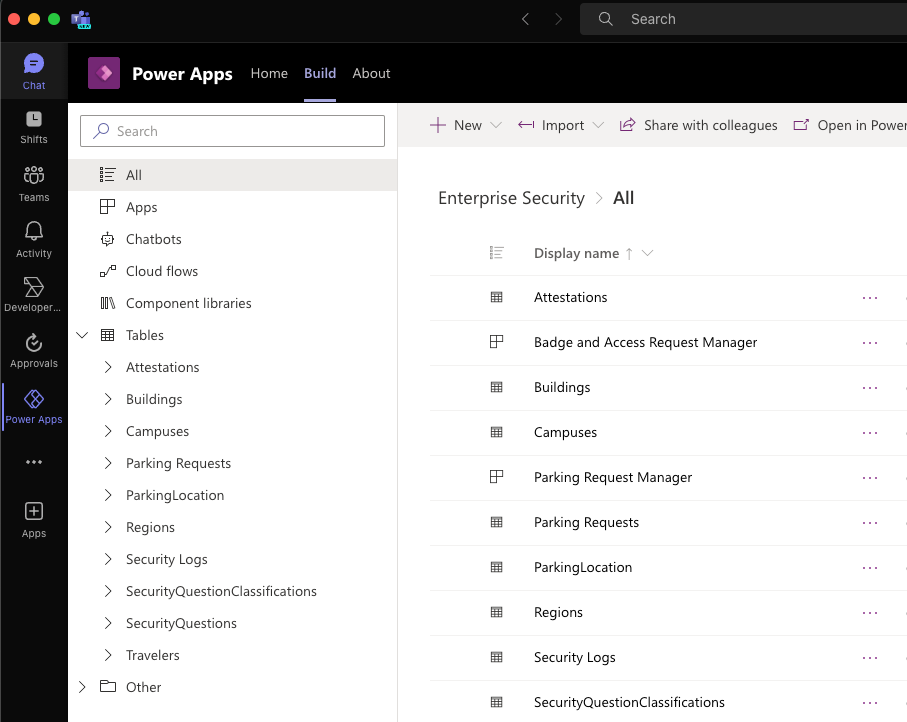
Open Power Apps in Teams, select the build tab, then select the Team. For the example in this post, the team is Enterprise Security.
Select See All.
You should see something similar to the following screenshot.
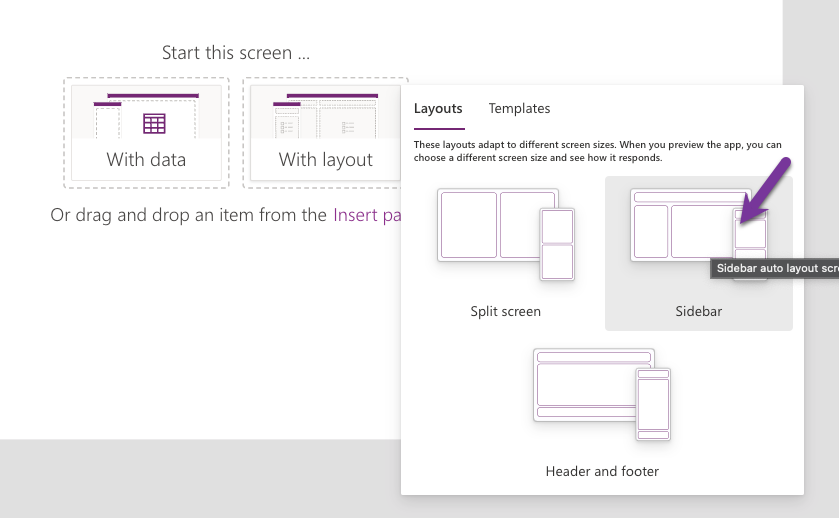
From the top nav bar, select the +New dropdown > Canvas app > Tablet form factor
But wait a minute I want to make the app available for all form factors!

We are going to design the app to work on a variety of devices not just tablets.
Give your app a name, for this example, Parking Request Manager
For Start this screen... choose With Layout
Change the Settings!
Let's start with enabling Modern Controls.
Modern Controls are now Generally available but we need to enable them.
In Settings and on the General tab click the toggle button for Modern controls and themes.
Click the Display tab
Make sure that Scale to fit and Lock aspect ratio toggle buttons are deselected.
Click Close
In the Modern controls drop down add a Header component to the Header Container.
HomeScren properties.
OnVisible -
 1// Reference: Reza Dorrani -https://powerusers.microsoft.com/t5/Building-Power-Apps/How-to-Generate-Dynamic-Year-List/td-p/374443
 2Clear(colYears);
 3ForAll(
 4    ColNum,
 5    If(
 6        Val <= (Year(Now()) - 1980),
 7        Collect(
 8            colYears,
 9            {Years: Year(Now()) - Val}
10        )
11    )
12);
13
14// Reset the Attestation Answers
15Clear(colAttestationAnswers);
Header component properties:
-
Logo - Provide an icon. I created one with the Microsoft Image Creator.
-
LogoTooltip - "Parking Request Manager"
In the App OnStart set the Theme to the following:
 1/*=========================================
 2GLOBALS
 3===========================================*/
 4// THEME - Reference: JSON from https://github.com/pnp/powerapps-designtoolkit
 5
 6Set(
 7    apptheme,
 8    {
 9        primaryColor: ColorValue("#4599C6"),
10        secondaryColor: ColorValue("#6244BB"),
11        tertiaryColor: ColorValue("#53565A"),
12        disabledColor: ColorValue("#888B8D"),
13        backgroundColor: Color.White,
14        elementBackgroundColor: RGBA(
15            217,
16            217,
17            214,
18            1
19        ),
20        textColor: RGBA(
21            0,
22            0,
23            0,
24            1
25        ),
26        lightTextColor: RGBA(
27            255,
28            255,
29            255,
30            1
31        ),
32        errorColor: ColorValue("#D22630"),
33        font: "Roboto,'Segoe UI'",
34        fontSize: 14,
35        borderRadius: 5,
36        borderColor: Color.Transparent,
37        inputFill: RGBA(
38            240,
39            240,
40            240,
41            1
42        ),
43        inputBorderThickness: 0
44    }
45);
46Set(
47    apptheme,
48    Patch(
49        apptheme,
50        {
51            primaryColorHex: Match(
52                JSON(
53                    apptheme.primaryColor,
54                    JSONFormat.IgnoreUnsupportedTypes
55                ),
56                "#[a-fA-F0-9]{6}"
57            ).FullMatch,
58            primaryColorTransparentHex: Match(
59                JSON(
60                    apptheme.primaryColor,
61                    JSONFormat.IgnoreUnsupportedTypes
62                ),
63                "#[a-fA-F0-9]{6}"
64            ).FullMatch & "4d",
65            secondaryColorHex: Match(
66                JSON(
67                    apptheme.secondaryColor,
68                    JSONFormat.IgnoreUnsupportedTypes
69                ),
70                "#[a-fA-F0-9]{6}"
71            ).FullMatch & "4d",
72            tertiaryColorHex: Match(
73                JSON(
74                    apptheme.tertiaryColor,
75                    JSONFormat.IgnoreUnsupportedTypes
76                ),
77                "#[a-fA-F0-9]{6}"
78            ).FullMatch & "4d"
79        }
80    )
81);
- BasePalleteColor - apptheme.primarycolor
SideBar Container
Contains one component a Tab List component.
Tablist Items property:
1["Home", "History", "Maps", "Travel Advisories","Contacts"]
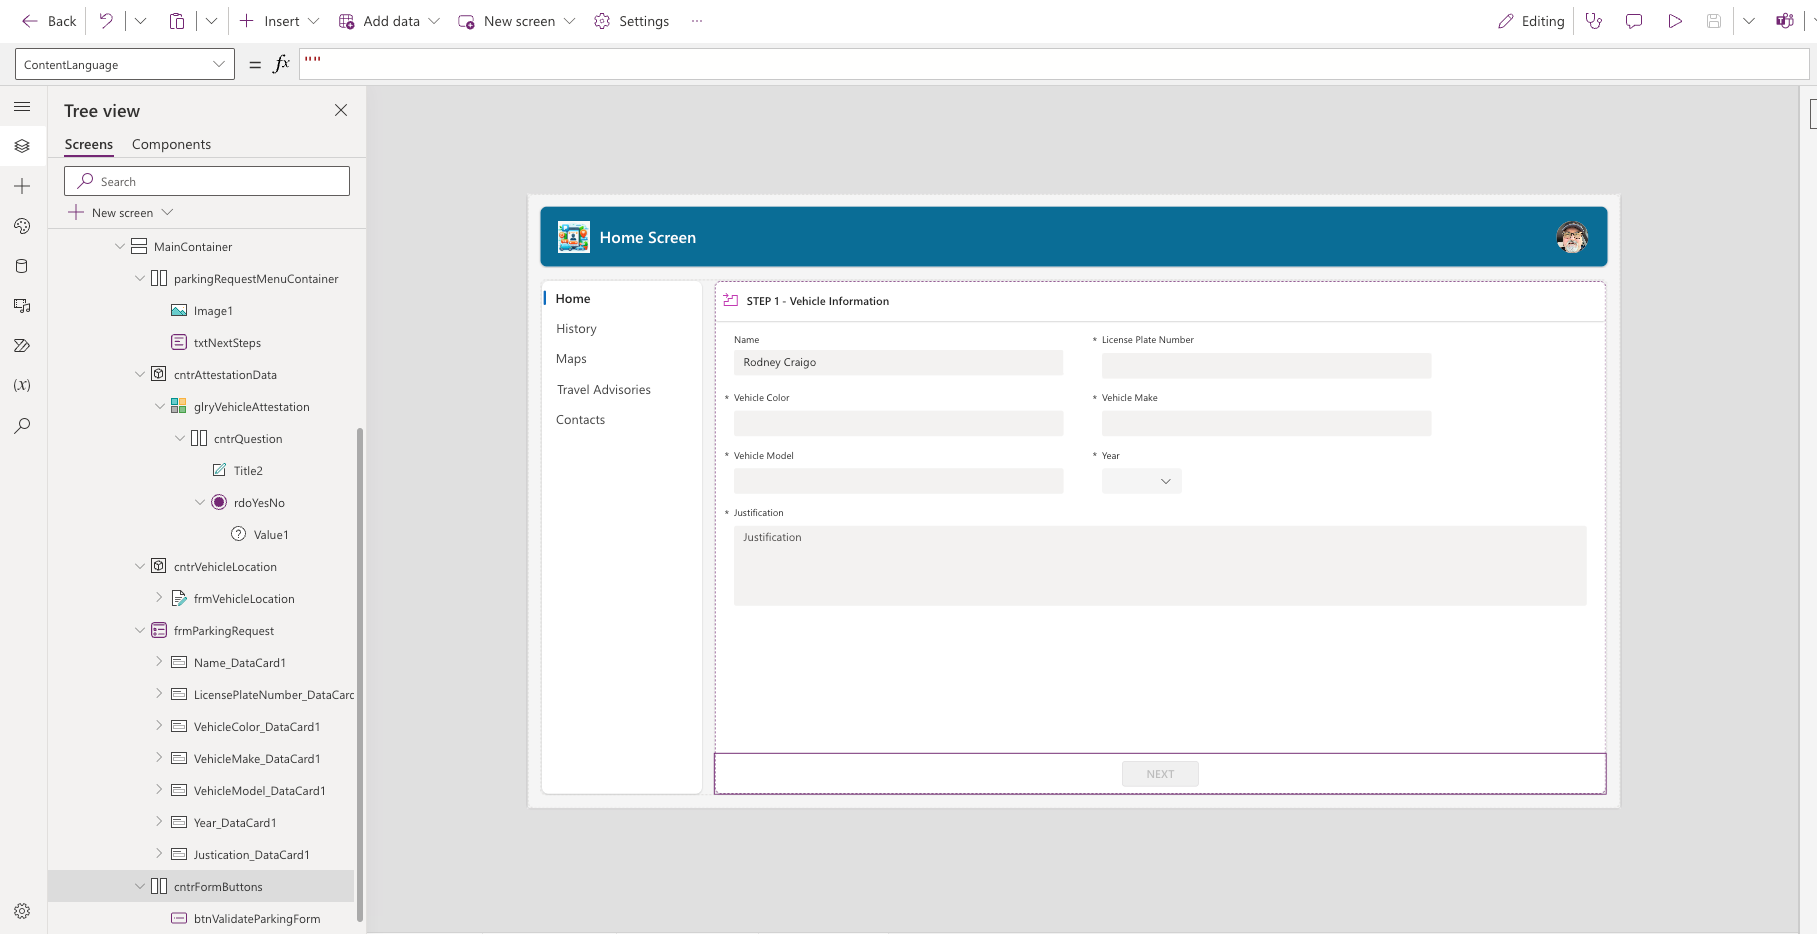
Main Container!
-
Horizontal container - The contains the STEP Title and an icon. Name: parkingRequestMenuContainer.
-
Container - Name: cntrAttestationData - Gallery Control named, glryVehicleAttestation. Each row of the glryVehicleAttestation contains a horizontal container that contains a Title and a Yes/No Radio group.
-
Container - Name: cntrVehicleLocation contains a single form called frmVehicleLocation
In the Main Container is a Form called frmParkingRequest. DataSource is the ParkingRequest Dataverse table.
Horizontal container contains the Step buttons.
Now would be a good time to document your app.
For documenting my projects I've now switched to using Microsoft Loop!
Before moving on, in App-OnStart let's setup the Default Globals.
 1/********************************************
 2* Defaults
 3*********************************************/
 4Set(
 5    reqID,
 6    Blank()
 7);
 8Set(
 9    showRequestForm,
10    true
11);
12Set(
13    showAttestations,
14    false
15);
16Set(
17    showVehicleLocation,
18    false
19);
20Set(
21    reqStage,
22    "STEP 1 - Vehicle Information"
23);
24NewForm(frmParkingRequest);
25
26// Reference: Reza Dorrani -https://powerusers.microsoft.com/t5/Building-Power-Apps/How-to-Generate-Dynamic-Year-List/td-p/374443
27ClearCollect(
28    ColNum,
29    {Val: 0},
30    {Val: 1},
31    {Val: 2},
32    {Val: 3},
33    {Val: 4},
34    {Val: 5},
35    {Val: 6},
36    {Val: 7},
37    {Val: 8},
38    {Val: 9},
39    {Val: 10},
40    {Val: 11},
41    {Val: 12},
42    {Val: 13},
43    {Val: 14}
44);
and in App-Formulas, setup the default Formulas, in this case one formula
1/*=========================================
2FORMULAS
3===========================================*/
4
5CUSER = Office365Users.MyProfileV2();
I will probably port some of the defaults in AppStart to Formulas but more on that later.
STEP Processes!
Basically, I am just hiding and showing a container and its associated elements based on where in the request the user is at.
STEP 1 - Vehicle Information
Requestor submits all of the required information. Once the requestor submits, the form data is stored in the Parking Request table in Dataverse and the app returns the ID associated with the request and stores this ID in a variable called reqID. btnValidateParkingForm
1SubmitForm(frmParkingRequest);
2Set(reqID, frmParkingRequest.LastSubmit.Name);
DisplayMode property:
1If(frmParkingRequest.Valid,DisplayMode.Edit, DisplayMode.Disabled)
frmParkingRequest properties:
OnSuccess -
1Set(showRequestForm, false);
2
3Set(reqStage,"STEP 2 - Parking Location");
4Set(showVehicleLocation, true);
5NewForm(frmVehicleLocation);
Visible -
1showRequestForm
STEP 2 - Parking Location
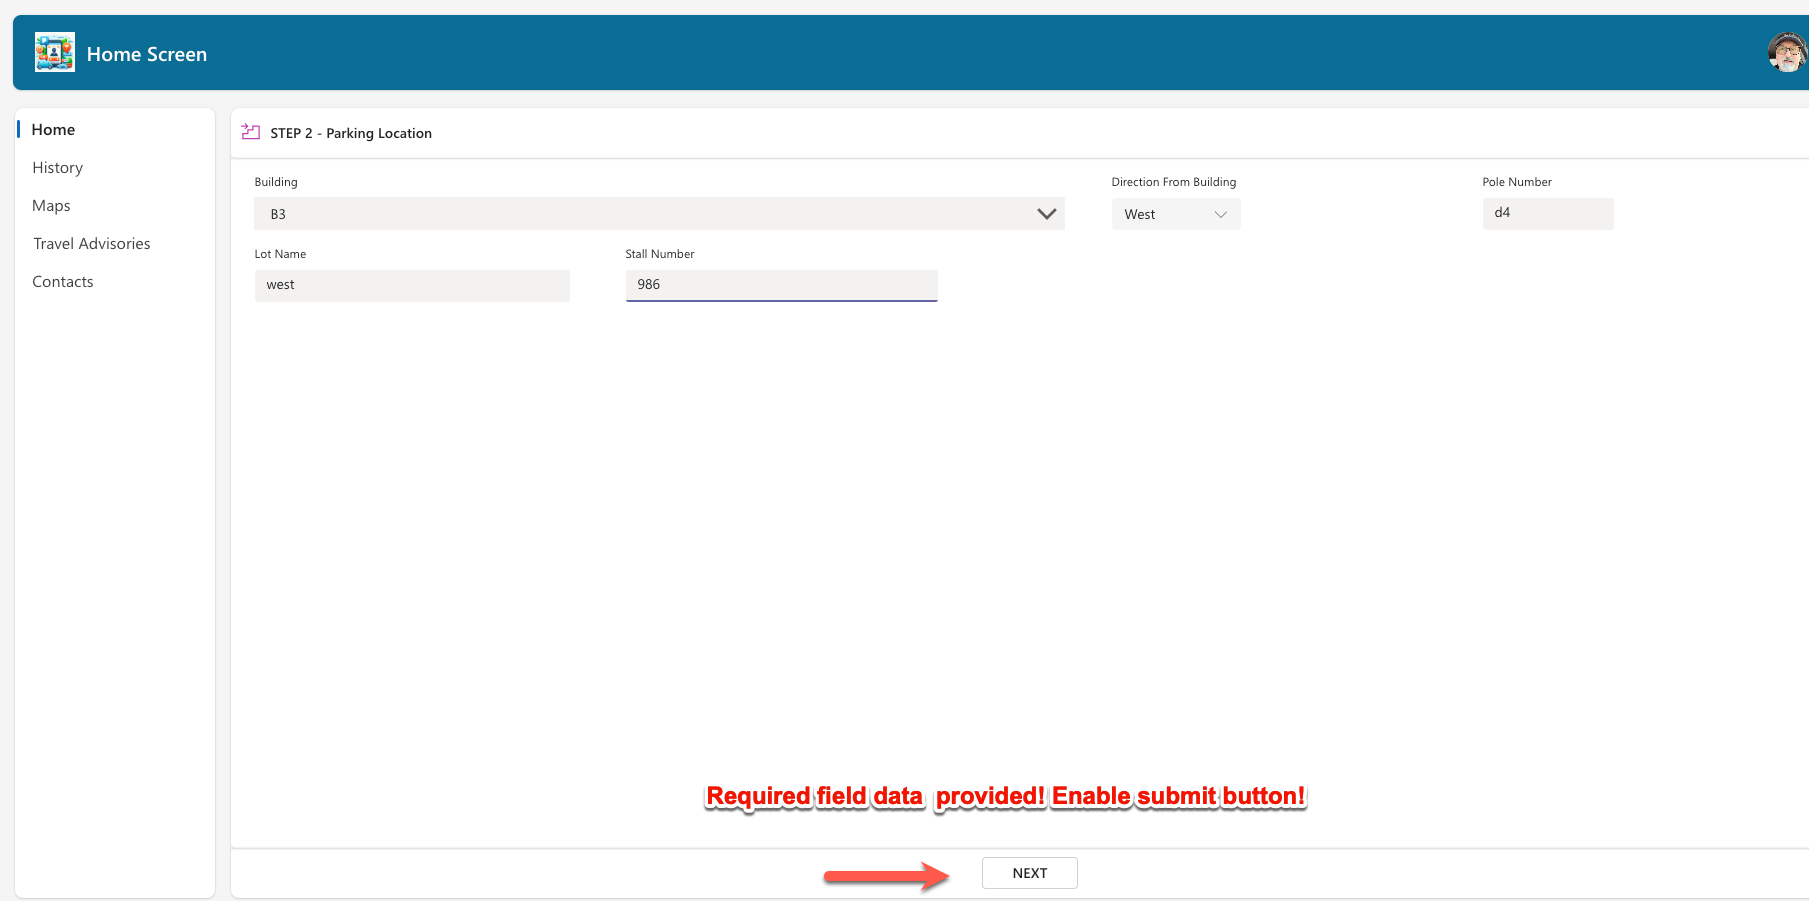
cntrVehicleLocation properties:
Visible -
1showVehicleLocation
frmVehicleLocation properties:
DataSource -
1ParkingLocations
OnSuccess -
1Set(showAttestations, true);
2
3Set(reqStage,"STEP 3 - Attestations");
4Set(showVehicleLocation, false);
btnValidateParkingLocation properties:
OnSelect -
 1SubmitForm(frmVehicleLocation);
 2Patch(
 3    ParkingRequests,
 4    First(
 5        Filter(
 6            ParkingRequests,
 7            Name = reqID
 8        )
 9    ),
10    {ParkingLocation: frmVehicleLocation.LastSubmit}
11);
Visible -
1showVehicleLocation
DisplayMode -
1If(IsBlank(dcParkingBuilding.Selected.Building),
2 DisplayMode.Disabled,
3 DisplayMode.Edit
4)
frmVehicleLocation properties:
OnSuccess -
1Set(showAttestations, true);
2
3Set(reqStage,"STEP 3 - Attestations");
4Set(showVehicleLocation, false);
DataSource -
1ParkingLocations
STEP 3 - Attestations
glryVehicleAttestation properties:
Items -
1// We only want to show the questions related to Parking Requests - Classification ID = 2
2Filter(SecurityQuestions,ClassificationID = "2")
cntrAttestationData properties:
Visible -
1showAttestations
rdoYesNo -
DefaultSelectedItems:
1If(IsEmpty(colAttestationAnswers),{Value: "No"})
Items:
1["Yes", "No"]
OnChange:
 1If(
 2    Self.Selected.Value = "Yes",
 3    Collect(
 4        colAttestationAnswers,
 5        {cr1f1_questionid: ThisItem.Name, cr1f1_answer: Self.Selected.Value , cr1f1_reqid: reqID}
 6    ),
 7    Remove(
 8        colAttestationAnswers,
 9        {cr1f1_questionid: ThisItem.Name, cr1f1_answer: Self.Selected.Value , cr1f1_reqid: reqID}
10    )
11);
btnFinishParkingReqSubmit properties:
OnSelect -
 1Collect(Attestations,colAttestationAnswers);
 2
 3
 4Set(showAttestations, false);
 5Set(showVehicleLocation, false);
 6Set(showRequestForm,true);
 7NewForm(frmParkingRequest);
 8
 9Set(
10    reqStage,
11    "STEP 1 - Vehicle Information"
12);
Visible -
1showAttestations
Now the requestor is returned to STEP 1 when they click the Attestation button labeled Finish.
Summary!
In this tutorial we setup the basic structure by walking the requestor through the process STEP by STEP.
In this article I covered creating the User Interface in Microsoft Power Apps for Teams.
In the next article we will create a Virtual Assistant to answer traveler questions.
Stay tuned for Real World Power Platform Projects - Parking Request Manager - part 3: Create an Approval Workflow!
Please be sure to check out the following companion video to this post.
Create a Parking Request App Using Dataverse for Teams & Power Apps! - Ep. 2 - Create The Form

Credits!
Images: Microsoft Designer Stunning designs in a flash!
App Icons: https://www.matthewdevaney.com/2000-free-power-apps-icons/
Select Year Dropdown Code: Reza Dorrani's code: https://powerusers.microsoft.com/t5/Building-Power-Apps/How-to-Generate-Dynamic-Year-List/td-p/374443